
Build a Smart Home Agent
Building conversational agents from scratch with LangGraph

This is the first lesson of the new open-source series to build a production-grade smart home agent. This is a hands-on journey to building conversational AI agents that control IoT devices using LLMs, LLMOps, and AI systems techniques.
🔗 Learn more about the course and its outline.
Welcome to Lesson 1, where we'll build the foundation of our smart home agent. We will focus on learning how to architect and build a conversational agent from scratch. By the end, you'll have a working conversational agent that can understand intent behind commands like "the living room is dim" and automatically adjust your lights.
Like any ML project, building a conversational agent is an iterative process where you continuously improve the capabilities of the agent. This is why this lesson will walk you through the mistakes and the debugging process to achieve a functional conversational agent.
What are we going to build?
The goal is simple: create an agent that can take a query like “The living room is dim” and autonomously:
Understand the user’s intent
Check the current state of the living room lights
Adjust the brightness accordingly
Confirm the action
🔗 Check is out this lesson code here
The Agent Core
Before we dive into code, let’s zoom in on what we’re actually building in this lesson. Figure 1 shows the complete smart home agent architecture, but in this lesson, we’re focusing exclusively on the Agent Core: the brain and hands of our agent.
The agent core consists of three key components: the LLM, the tools and the feedback loop between them. Given a user query, the LLM understands the user’s request and generates a plan to answer it. This plan is a sequence of actions that are executed using the tools. For example, to control the devices in a home, we need a way to access and update the device’s current state. This can be done using device control tools.
What makes this system an agent is that the LLM decides when to use (or not use) a specific tool. Based on the tools' feedback, the LLM is capable of adjusting its plan and self-correcting when things go wrong, as you will see in our debugging journey later.
The Tech Stack
To build the first version of our smart home agent, we will use:
There are several agent frameworks out there (CrewAI, Haystack, etc) but I chose LangGraph because it is the go-to framework to build conversational agents. Thanks to its built-in state management, it is easy to maintain conversation history and agent state across multiple turns. This is crucial for conversational agents that need to remember context.
For LLM monitoring, Opik is my go-to tool. I prefer to use Opik over LangSmith because Opik is an open-source project that is free to use and doesn’t require a license to self-host unlike LangSmith. As we’ll see later, Opik is also very easy to setup and integrate into your agent workflow. Another popular choice is LangFuse, but I’ve been using Opik for a couple of years now and, as they say, you don’t change a winning team.
To keep this content accessible, I chose not to interact with real IoT devices. Instead, we’ll use a JSON-based home template to simulate device states. This approach lets us focus on the agent logic without dealing with hardware setup. The patterns you’ll learn here will transfer directly to real device integrations.
Let’s start building our agent !
The basics of LangGraph
In LangGraph, an agent is defined, you guessed it, as a graph.
The graph defines the structure of the agent, consisting of nodes and edges.
Nodes can be LLMs and/or functions that the agent can call
Edges specify how the agent should transition between nodes
Our smart home agent has two nodes: The LLM and the tools. The action and the feedback in Figure 1 are our edges.
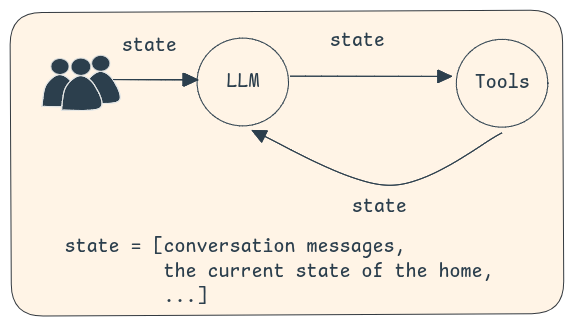
Remember, our goal is to build a conversational agent capable of controlling devices. Hence, our agent should be able to keep track of the ongoing conversation and the current state of the home. This is the agent state. More generally, it contains all the relevant information about the current agent execution. It persists across nodes allowing information to be passed between LLM calls, tools, and other computation steps (see Figure 2).
Defining our agent state
To build our agent logic, we will use a StateGraph in which nodes communicate by reading from and writing to a shared state. In this state, we will store the messages exchanged between the user and the agent. This is important for a conversational agent since it needs to remember the history of interactions. In addition to the messages, the smart home agent also needs to know the current state of the home (i.e. the devices). Here is how we can define the agent’s state in LangGraph:
class AgentState(MessagesState):
    home_state: dict[str, str]
Our agent state inherits from MessagesState which is a built-in state that automatically captures the conversation history in a messages attribute.
Defining our LLM node
Now, we need to add nodes to the graph. The first node response_node represents the LLM component from our architecture. This node is simply a chat model that will make decisions about what actions to take.
Here is the implementation of the response_node. It takes the agent state as an input and invokes a response chain based on the messages. The response chain takes the prompt and invokes the LLMs to get a response. This response is the next action to perform based on the input. This action could be calling a tool, returning the final response or ending the conversation.
🔗 Checkout the full implementation here
async def response_node(state: AgentState):
    response_chain = get_response_chain()
    response =  await response_chain.ainvoke({”messages”: state[”messages”]})
    return {”messages”: response}

def get_response_chain():
    model = get_chat_model()
    system_message = “You are a smart agent capable of controlling IoT devices in a home.”
    prompt = ChatPromptTemplate.from_messages(
        [(”system”, system_message), MessagesPlaceholder(variable_name=”messages”)],
        template_format=”f-string”,
    )
    return prompt | model
The
messagesdo NOT ONLY contain the interactions between the user and the LLM but also the outputs of the tools. This implements the Feedback arrow you see in the architecture diagram, enabling the agent toobservethe outputs of the tool calls and plan accordingly.
The
nodehas access to the agent's state, not the LLM. As you can see from the code, themessagesare passed in the LLM prompt. The LLMcannotdirectly access the state. This distinction is crucial and will come up again when we debug the agent.
I'm using a pretty simple system prompt here. The objective of this lesson is not to find the right prompt. And I think it is interesting to see the performance of the agent without any prompt optimization.
Defining our tools
Now, we want to equip our agent with the ability to control our devices. These tools should enable the agent to access a device state and/or update a device state. These tools are important because they enable the agent to perform actions on the devices and receive feedback from the environment (i.e. the home).
For simplicity, I'm going to define a home template in a JSON format. Examples are available under home_templates.
@tool
def get_device_state(state: Annotated[dict, InjectedState], device_name: str, room_name: str) -> dict[str, str]:
    """
    Returns the state of a device in a room.
    If there are multiple devices, it returns the list of all devices.
    """
    room_name = room_name.lower()
    device_name = device_name.lower()
    home_state = state["home_state"]

    if room_name not in home_state:
        return f"The room {room_name} does not exist. Here is the list of the rooms in the house {home_state.keys()}"

    if device_name not in home_state[room_name]:
        return f"The device {device_name} does not exist. Here is the list of devices in the room {room_name}: {home_state[room_name].keys()}"

    return home_state[room_name][device_name]["state"]
The get_device_state tool will access the home state from the agent’s state and return the requested device status.
Here is critical information to know: It is the LLM that provides the tool's parameters. When I first let the LLM provide the home state as a parameter, I got multiple errors because the LLM hallucinates and provides a wrong state. One solution is to provide the home state in the LLM prompt but this is not a good idea because you are still at the mercy of the LLM to correctly pass the home state to the tools. To avoid these issues, I decided to get the home state from the agent state instead using InjectedState. The LLM won't see or provide this parameter—it's injected automatically at runtime.
Pro tip: Inject information from the agent state directly to the tools to avoid LLM mistakes.
Next, let’s create our next tool which is update_device. As the name suggests, this tool is capable of changing the current state of a device, hence the home state. That is why this tool returns a Command to update the agent state and append a confirmation message to the state messages.
@tool
def update_device(state: Annotated[dict, InjectedState], device_name: str, room_name: str, new_device_info: dict[str, Any], tool_call_id: Annotated[str, InjectedToolCallId]
) -> Command:
    """
    Updates a device in a room
    """
    room_name = room_name.lower()
    device_name = device_name.lower()
    home_state = state["home_state"]

    if room_name not in home_state:
        return f"The room {room_name} does not exist. Here is the list of the rooms in the house {home_state.keys()}"

    if device_name not in home_state[room_name]:
        return f"The device {device_name} does not exist. Here is the list of devices in the room {room_name}: {home_state[room_name].keys()}"

    # Check if the new device info follows the same structure
    # The LLM can provide any value and it will override the current value
    # If it doesn't follow the initial structure, it will cause bugs
    if not isinstance(new_device_info, dict):
        return f"The new device info should be a dictionary"

    if set(new_device_info.keys()) != set(home_state[room_name][device_name].keys()):
        return f"The new device info should follow the same structure as {home_state[room_name][device_name]}"

    new_home_state = deepcopy(home_state)
    new_home_state[room_name][device_name] = new_device_info

    return Command(update={
        "home_state": new_home_state,
        "messages": [
            ToolMessage(
                f"Updated the state of the device {device_name} in the room {room_name} to {new_device_info}",
                tool_call_id=tool_call_id
            )
        ]
    })
Pro tip: write meaningful error messages in your tools because these errors will be passed to the LLM and can help it to self-correct.
Note that we had to make checks to verify if the tool inputs (provided by the LLM) are correct. These checks are the results of a lot of debugging. Such tests are crucial because we have no control over what the LLM will provide as inputs—we need to set up checks and catch errors.
Next, we need to create a node that runs these tools when called. This can be done by creating a function like response_node. However, it's simpler to use LangGraph's prebuilt ToolNode.
device_control_node = ToolNode([get_device_state, update_device])We also need to make the LLM aware of these new tools which we achieve through bind_tools.
def get_response_chain():
    model = get_chat_model()
    model = model.bind_tools(device_control_tools)
    # (same as above)
    return prompt | model
Building the agent graph
At this point, we’ve built the complete Agent Core! We have the LLM, the tools and the actions and feedback loop between them. Now, it is time to glue them together and create our agent. Notice how we used a conditional edge between the LLM and the tools. This enables the agent to decide when it needs to call a tool.
def create_graph():
    graph_builder = StateGraph(AgentState)
    # add nodes to the graph
    graph_builder.add_node("response_node", response_node)
    graph_builder.add_node("tool_node", tool_node)
    # add edges between nodes
    graph_builder.add_edge(START, "response_node")
    graph_builder.add_conditional_edges(
        "response_node",
        tools_condition,
        {"tools": "tool_node",END: END})
    graph_builder.add_edge("tool_node", "response_node")
    graph_builder.add_edge("response_node", END)
    return graph_builder

graph = create_graph().compile()
Congratulations ! now you can test your agent and ask it simple commands like `What is the temperatue in the living room` or `Is the TV on?`.
Agent Monitoring
As your Agent Core grows in complexity, monitoring becomes critical. With Opik, we can add monitoring in just two lines of code:
tracer = OpikTracer(graph=graph.get_graph(xray=True))
result = await graph.ainvoke(
    {"messages": [command], "home_state": initial_home_state},
    config={"callbacks": [tracer]}
)
This will log all the different steps of the graph execution in traces, giving you:
Complete visibility into your agent’s decision-making process
Timing information for each node
Input/output at each step
Tool call parameters and results
As we add more tools and complexity to the Agent Core in future lessons, you’ll see exactly why this observability is essential.
The Debugging Journey: From Broken to Working
Let’s see if our agent is actually working! This is where things get interesting. Agent development is rarely a straight path. It's an iterative process of testing, identifying issues, and refining. Let me show you what happened.
Iteration 1:
We're going to test it with this command: "The living room is dim, can you fix that?".
Here’s what the agent did on the first try:
HUMAN: the living room is dim can you fix that ?
TOOL: The room living room does not exist. Here is the list of the room in the house dict_keys([’kitchen’, ‘dining’, ‘living_room’, ‘bedroom’, ‘hall’, ‘entry’, ‘bath’])
TOOL: {”state”: 1, “brightness”: 50, “color”: “white”}
TOOL: Updated the state of the device light in the room living_room to {’brightness’: 100, ‘color’: ‘white’, ‘state’: 1}
AI: The lighting in the living room should now be brighter.
What went well:
The feedback loop worked perfectly! The agent:
Tried to check the current state (using get_device_state tool)
Received feedback about the error
Self-corrected and tried again
Adjusted the brightness to 100%
Confirmed the action
What went wrong:
Notice how get_device_state was called twice because the LLM provided a wrong room name (living room instead of living_room).
Why this happened:
Remember that although the home state is an attribute of the agent state, the LLM doesn't have access to the agent state. It's only available at the node level. The LLM is guessing the room name based on the user's input.
This is a key insight: the LLM in our Agent Core can only see what we explicitly pass to it through the prompt.
So, let’s fix that and give the LLM the home template to avoid mistakes like this. We can do that by updating the system message of the `get_response` chain.
system_message = """You are a smart agent capable of controlling IoT devices in a home.
Current home state: {current_home_state}"""
Iteration 2:
Running the same command again with the updated prompt:
HUMAN: the living room is dim can you fix that ?
TOOL: The new device info should follow the same structure as
      {'state': 1, 'brightness': 50, 'color': 'white'}
TOOL: Updated the state of the device light in the room living_room to
      {'brightness': 100, 'color': 'white', 'state': 1}
TOOL: {"brightness": 100, "color": "white", "state": 1}
AI: The light in the living room is now on with 100% brightness and white color.
What went well:
By adding the home state to the LLM's context, the first tool call to get_device_state disappears. The LLM is now trying directly to update the device state. This saves us one tool call and makes the agent more efficient.
What went wrong:
The LLM is still providing wrong tool parameters—the new_device_info specifically. Even though the structure of the device state is provided to the LLM, it's failing to correctly call the tool on the first attempt. Again, the feedback loop saved us—the error message told the LLM exactly what structure it needed to follow.
To fix this issue, we need to make the tool description more explicit. I added a short description for each tool parameter in the docstring (except the state because that will be injected during execution, not provided by the LLM):
@tool
def update_device(state: Annotated[dict, InjectedState], device_name: str, room_name: str, new_device_info: dict[str, Any], tool_call_id: Annotated[str, InjectedToolCallId]
) -> Command:
    """
    Updates a device in a room.

    Args:
        device_name: The name of the device to update
        room_name: The name of the room where the device is located
        new_device_info: The new updated device information.
                        This should follow the same structure as in the home state
    """
Iteration 3:
Here is the LLM’s response after these changes!
HUMAN: The living room is dim can you fix that?
TOOL: Updated the state of the device light in the room living_room to
      {'brightness': 100, 'color': 'white', 'state': 1}
TOOL: {"brightness": 100, "color": "white", "state": 1}
AI: The light in the living room is now on with 100% brightness and a color of white.
Much cleaner! The agent now:
Directly updates the light brightness without the initial fumbling
Verifies the update was successful (through the feedback loop)
Responds to the user
Main takeaways:
From this simple example, we can already make a couple of observations that showcase why developing agents is not simple:
Prompt/Context Engineering is Critical: The example above made it clear that the agent context and the tool descriptions are very important to improve the agent’s reasoning flow. This is not surprising because in an agent, the LLM makes decisions based on this information.
Error Recovery Through Self-Reflection: The example showed how expressive error messages helped the agent recover and self-correct. When the room name didn't exist, the error message listed all available rooms, allowing the agent to try again with the correct name.
Optimal reasoning flow: The agent increased the light brightness with two tool calls: it first updated the device state and then checked the device state before answering. The last device check is arguably unnecessary, especially since the
update_devicetool output clearly mentions the new device status. This could be seen as a safety measure, but as the number of tools increases, the agent’s flow should be as optimal as possible (i.e., as few tool/LLM calls as possible).
Conclusion
In this lesson, we built the Agent Core—the brain and hands of our smart home agent using LangGraph. All the code is available in the course Github.
In Lesson 2, we’ll extend our Agent Core with memory capabilities so the agent can:
Remember context across conversations
Handle more complex multi-step tasks like “Turn off all the lights in the house”
Learn user preferences over time